User Guide
Last updated: April 27, 2026
Welcome to our guide! Here we explain the most important concepts around BibTeX Studio. For tutorials on BibTeX and BibLaTeX, please visit bibtex.eu.
Table of contents
Why BibTeX Studio?
BibTeX Studio is a web application for creating modular bibliographies and citations based on BibTeX and BibLaTeX. Unlike most other reference management tools, it was built specifically for these formats. That means research projects do not have to be “exported” as BibTeX first, which often leads to faulty .bib files and prevents the use of BibLaTeX-specific entry types and fields.
Every project is a standalone, collaborative .bib file extended with basic reference management features and a few convenience functions. Each project also has a URL endpoint that lets you easily connect project libraries to online LaTeX and Markdown editors, including Overleaf, RStudio, Quarto, and Typst. For local usage, projects can also be downloaded.
Project libraries
BibTeX is designed so that only cited entries are added to the bibliography of the respective document. In principle, it therefore does not matter whether, or how many, irrelevant entries are included in the referenced .bib file. However, the larger the file becomes, the more problems tend to appear, including:
- Long compile times
- Merge conflicts when collaborating with Git
- Frequent mistakes caused by cognitive overload, such as inconsistent citekeys or duplicate entries
With BibTeX Studio, you can instead create project-specific, flexible, and collaborative libraries.
- Short compile times thanks to project-specific
.bibfiles - Collaborative management without using Git
- Fewer mistakes thanks to a clear UI and automatic conflict-prevention helpers
For example, BibTeX Studio adds a suffix to the citekey of a duplicate entry if you accidentally add one. citekey becomes citekey-2.
Create a project library
After logging in, you will first see the project overview. To create a new project, click New project in the top left. Give your project a name, then click Create new project.
Copy a project library
Click Copy project in the context menu of the relevant project library. Optionally, give the project a new name. Otherwise, the suffix -Copy will be added to the project name. Copying project libraries can be very useful, for example for:
- A series of publications
- A shared project with many entries
The selected project library is copied with all of its entries, keywords, and groups, but without its users.
Project library view
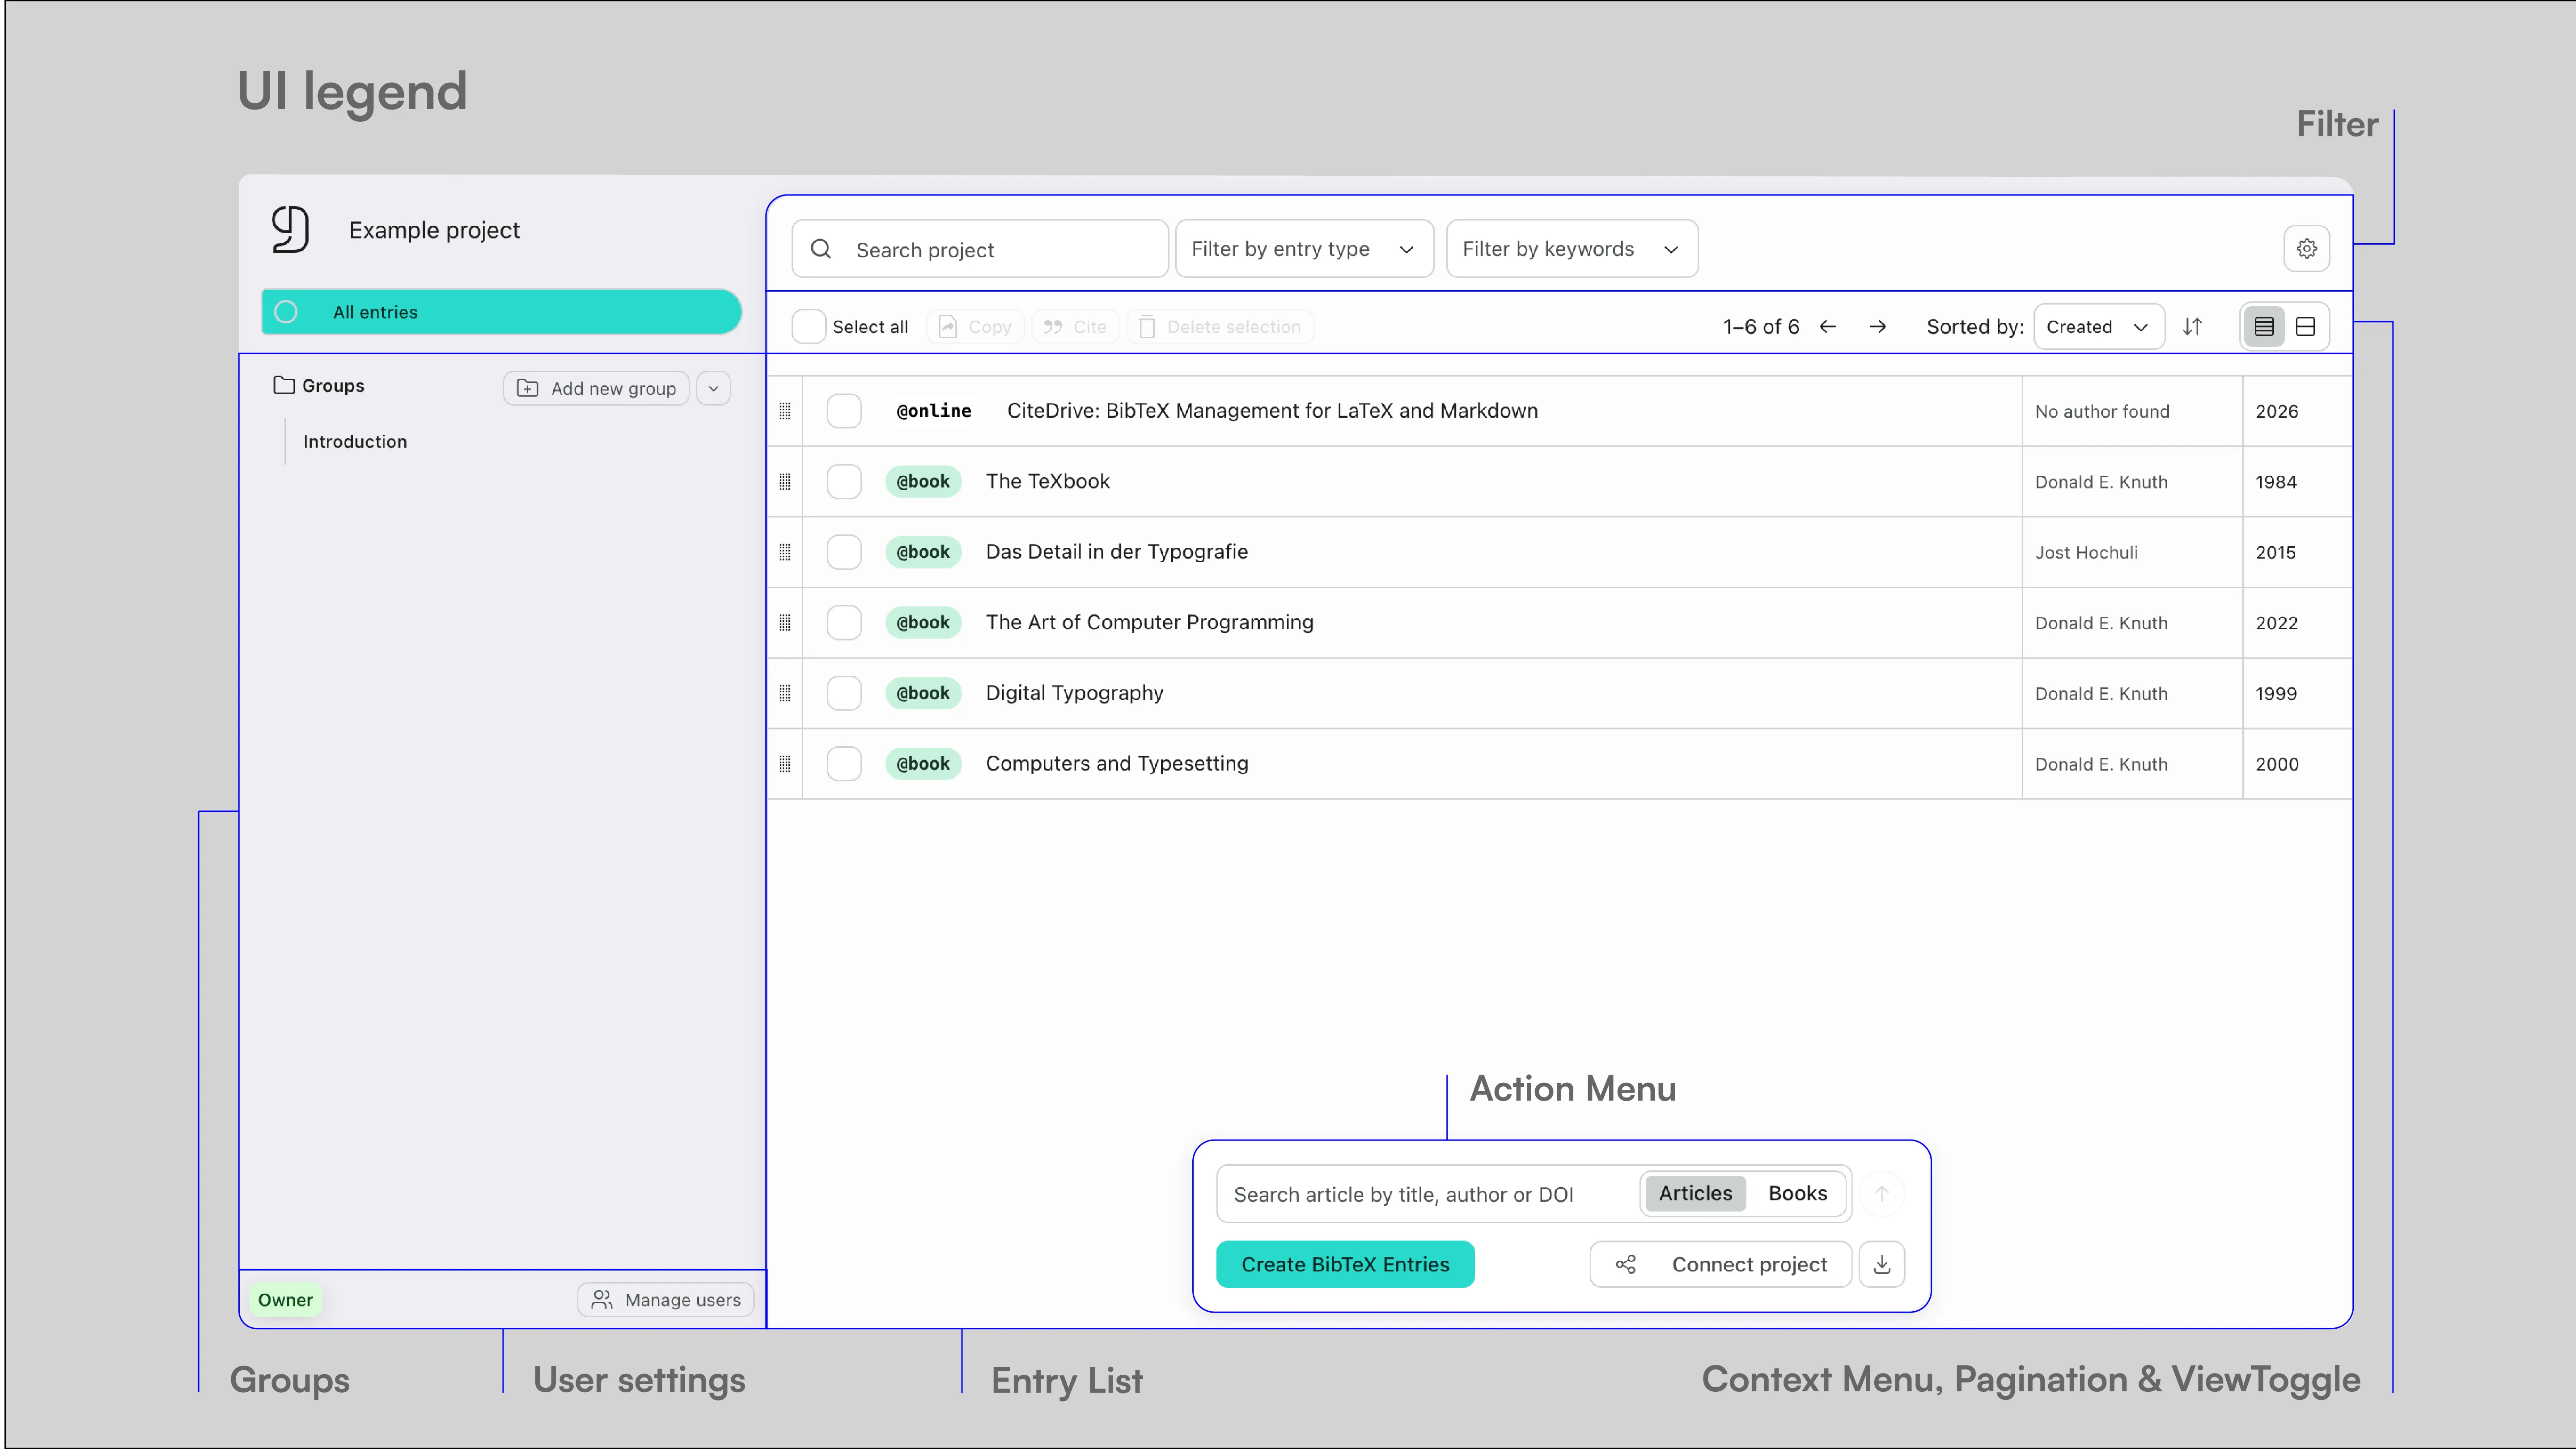
The heart of every project is the entry list. The entry list shows the currently active selection: all entries, entries from a specific group, and/or filtered entries. The entry list includes a context menu that lets you cite, copy, delete, or remove selected entries from groups. To the right of the context menu, you will find sorting, the view toggle, and pagination. BibTeX Studio shows 50 entries per page.
Directly above the entry list are the project search and filter options (entry types and keywords).
To add entries and connect your project, use the options in the action menu. In the left column, you can create groups for your project and manage users.
Connecting to an editor
Every project generates its own URL, which can be connected to editors such as Overleaf or RStudio and used there as a .bib file. Click Connect project in the action menu to view your project URL.
Overleaf
- Copy the URL
- File → New File → From External URL → paste URL → name it, e.g., bibliography.bib
- Changes made by you or your team → refresh Overleaf
R-Studio & Quarto
- Copy the URL
- Paste it in the YAML header of your project:
  ---
  title: "Your Project"
  ...
  bibliography: "https://app.citedrive.com/your-project-url"
  ---
You can download your project as a .bib file at any time and use it locally with any LaTeX or Markdown editor.
Adding entries
To add entries to your projects, you can use the options in the action menu, the controls in the lower area of the entry list, and our official browser extension. You can also copy selected entries to other projects through the context menu. The action menu lets you add entries manually and search different databases for articles and books.
Add entries manually
To add an entry manually, click Create BibTeX entries in the action menu. This opens the entry editor. The entry editor has two modes: code editor and input form. By default, the code editor opens first. One advantage of the code editor over the form is that you can add several entries at once. It is also optimized for writing BibLaTeX entries and highlights syntax errors, among other things.
Start your entry with @ to display a complete list of all entry types.
Note
If you do not see the BibLaTeX-specific entry types, make sure BibLaTeX is enabled in the settings.
After selecting an entry type, a complete template for that entry type is created. The templates for all entry types were taken from the official BibTeX and BibLaTeX documentation. Alternatively, you can create the entry in input form mode. In the lower left of the entry editor, you will also find three useful functions:
- Automatically formatting the current entry (useful only in code editor mode)
- Generating or overwriting the citekey in author-year-title format
- Escaping special characters such as umlauts
Once you are finished with your input, click Save entry in the lower right to add the entry to your project.
Tip
You can import several existing entries by copying the code for multiple entries into the code editor and then saving.
Search online databases
Enter a search term (title or author, DOI, or ISBN) in the input field of the action menu. Then select the search context (articles or books) and run the search. Select the desired search result, edit the entry if necessary, and then click Add to project in the lower right.
Use the browser extension
With CiteDrive’s browser extension “BibTeX Connect”, you can add entries directly from sources such as PubMed, arXiv, Google Scholar, and websites to your CiteDrive projects. The extension is currently available for:
Log in to the extension with your CiteDrive credentials. Select the project to which the entry (article, website, etc.) should be added and edit it if necessary before adding it to your project.
Copy entries to another project
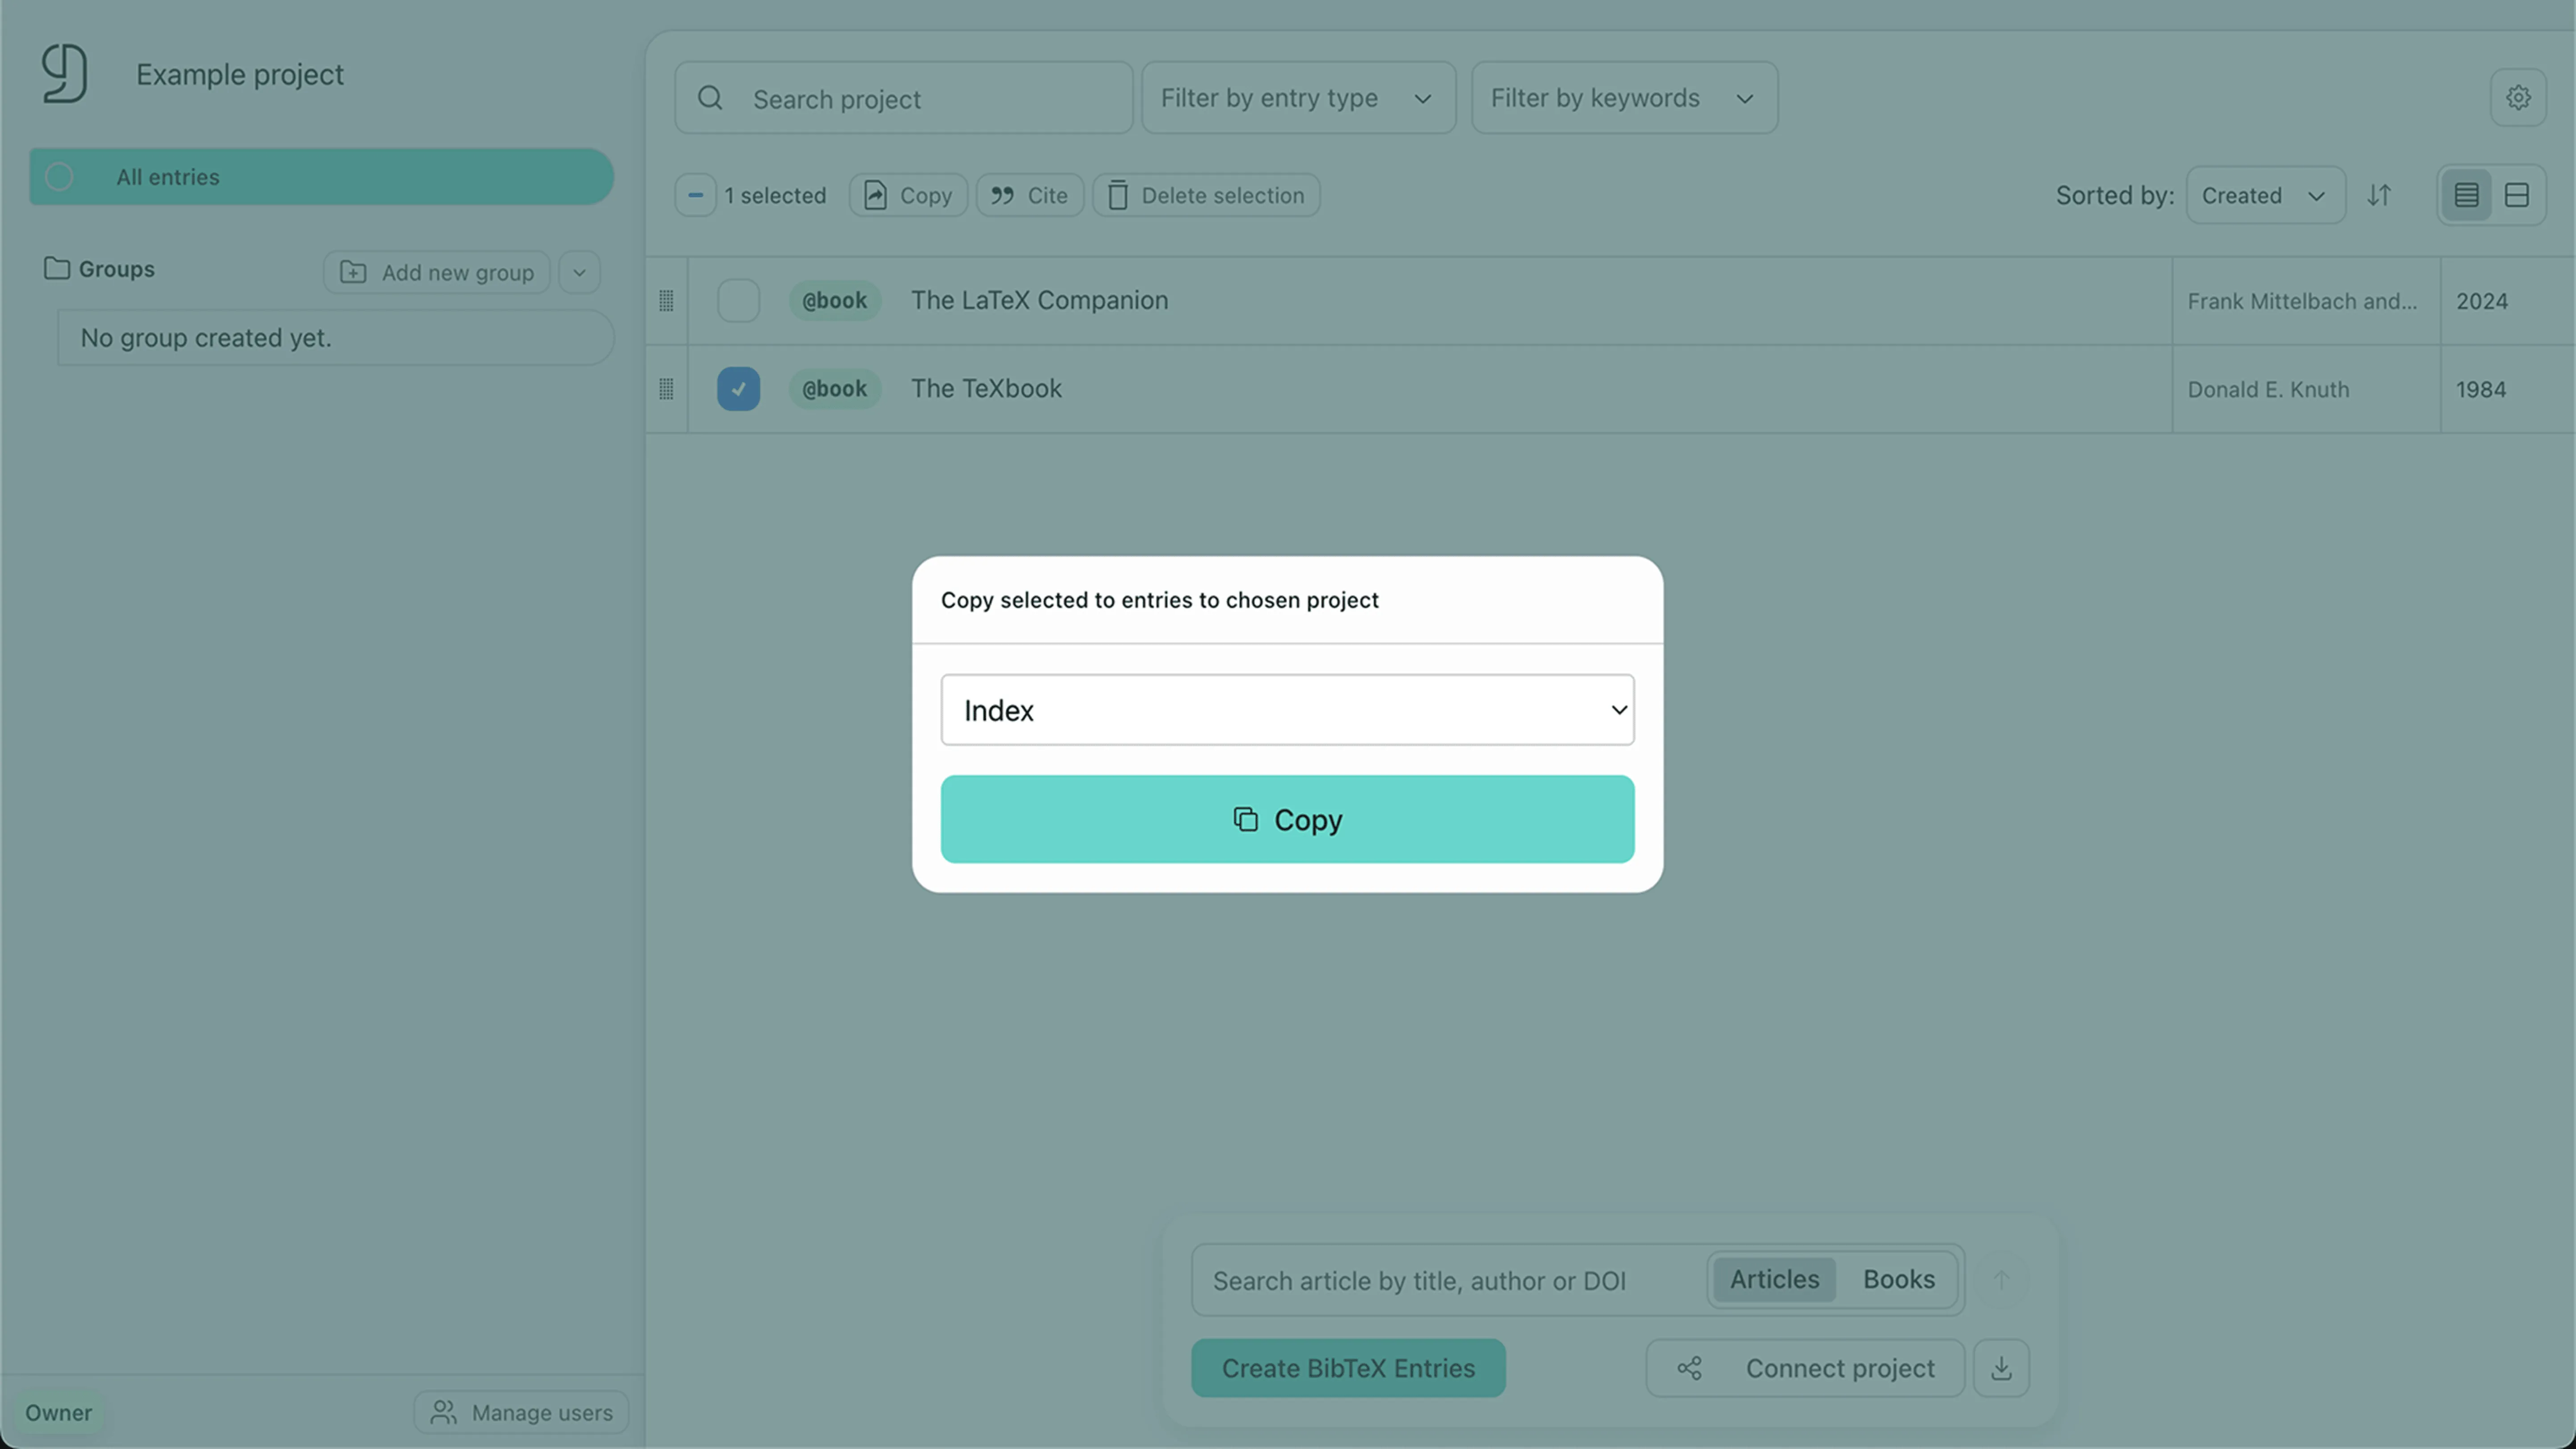
Select the entries you want to copy to another project, then click Copy in the context menu. Choose a project and copy the entries. Copied entries are independent from the originals. This means changes to the original do not affect the copy, and vice versa.
Managing entries
BibTeX Studio offers several ways to manage and organize your entries, including search, filters, groups, and view modes.
Edit entries
To edit an entry, click the corresponding entry in the entry list. The entry editor opens on the right. To save your changes, click Save entry in the lower right. You can center the entry editor by clicking the button in the top right.
Search for entries
To search for entries in your project, use the search bar above the entry list. By default, search checks the following fields in your entries:
- Author
- Title
- Year/Date
The search results are shown as entries in the entry list. Click the x icon in the search bar to clear the search.
Note
Search is context-aware. If you search while a group and/or filter is active, only that context (for example, the active group) is searched.
Filter entries
You can filter your entries by using the filter options above the entry list:
- Entry types
- Keywords
To filter by keywords, you need to add a keywords field to your entries. Add it in the entry editor and enter the desired keywords as a comma-separated list, or use the input form.
@Book{knuth2000,
  title         = {Computers and Typesetting},
  author        = {Knuth, Donald E.},
  year          = {2000},
  publisher     = {Addison-Wesley Professional},
  ...
  keywords      = {Typography, TeX},
}
Afterward, you can filter your entries by the relevant keywords. Select one or more keywords in the selection menu above the entry list, or click a keyword in the extended view.
Note
If you select multiple keywords, they are currently combined with AND logic. This means only entries containing all selected keywords are shown. We will add OR logic in a later version.
Groups
Groups help you organize entries within a project. For example, you can represent different chapters of your paper or different subject areas. To create a group, click Add new group in the left column. Give the group a name and confirm with Enter. To add entries to a group, select them in the entry list and drag them onto a group. Release to add the entries to that group.
You can rename a group later.
View modes
There are two different views for the entry list: simple view and extended view. You can switch between them by clicking the view toggle to the upper right of the entry list.
- Simple view: Shows only the most important information for each entry (type, author, title, year).
- Extended view: In addition to the fields shown in simple view, this also shows each entry’s keywords. In extended view, you can also click a keyword to filter your entry list by that keyword. The entry title is shown in full.
Create citations
To create citations from your project, select the desired entries in the entry list and then click Cite in the context menu. CiteDrive creates a citation command with the corresponding citekey. Copy it and paste it into your document. Currently, citation commands can be generated for BibTeX, BibLaTeX, and Markdown. You can also create a citation command for several selected entries at once.
Citekey
The citekey is a unique identifier for each entry in your .bib file. By default, BibTeX Studio generates the citekey in author-year-title format. To do this, click Overwrite citekey. The citekey of entries imported or added through database search or the browser extension can be overwritten in the same way.
Collaboration
Each project can be used and edited collaboratively by multiple users. The permissions each user has depend on their assigned role.
Roles
There are four different roles in BibTeX Studio:
- Owner: The creator of the project library. Has all permissions, including the ability to delete the project library and manage users.
- Admin: Can add, edit, and delete entries, and manage users.
- Editor: Can add, edit, and delete entries.
- Viewer: Can only view the project library.
Add members
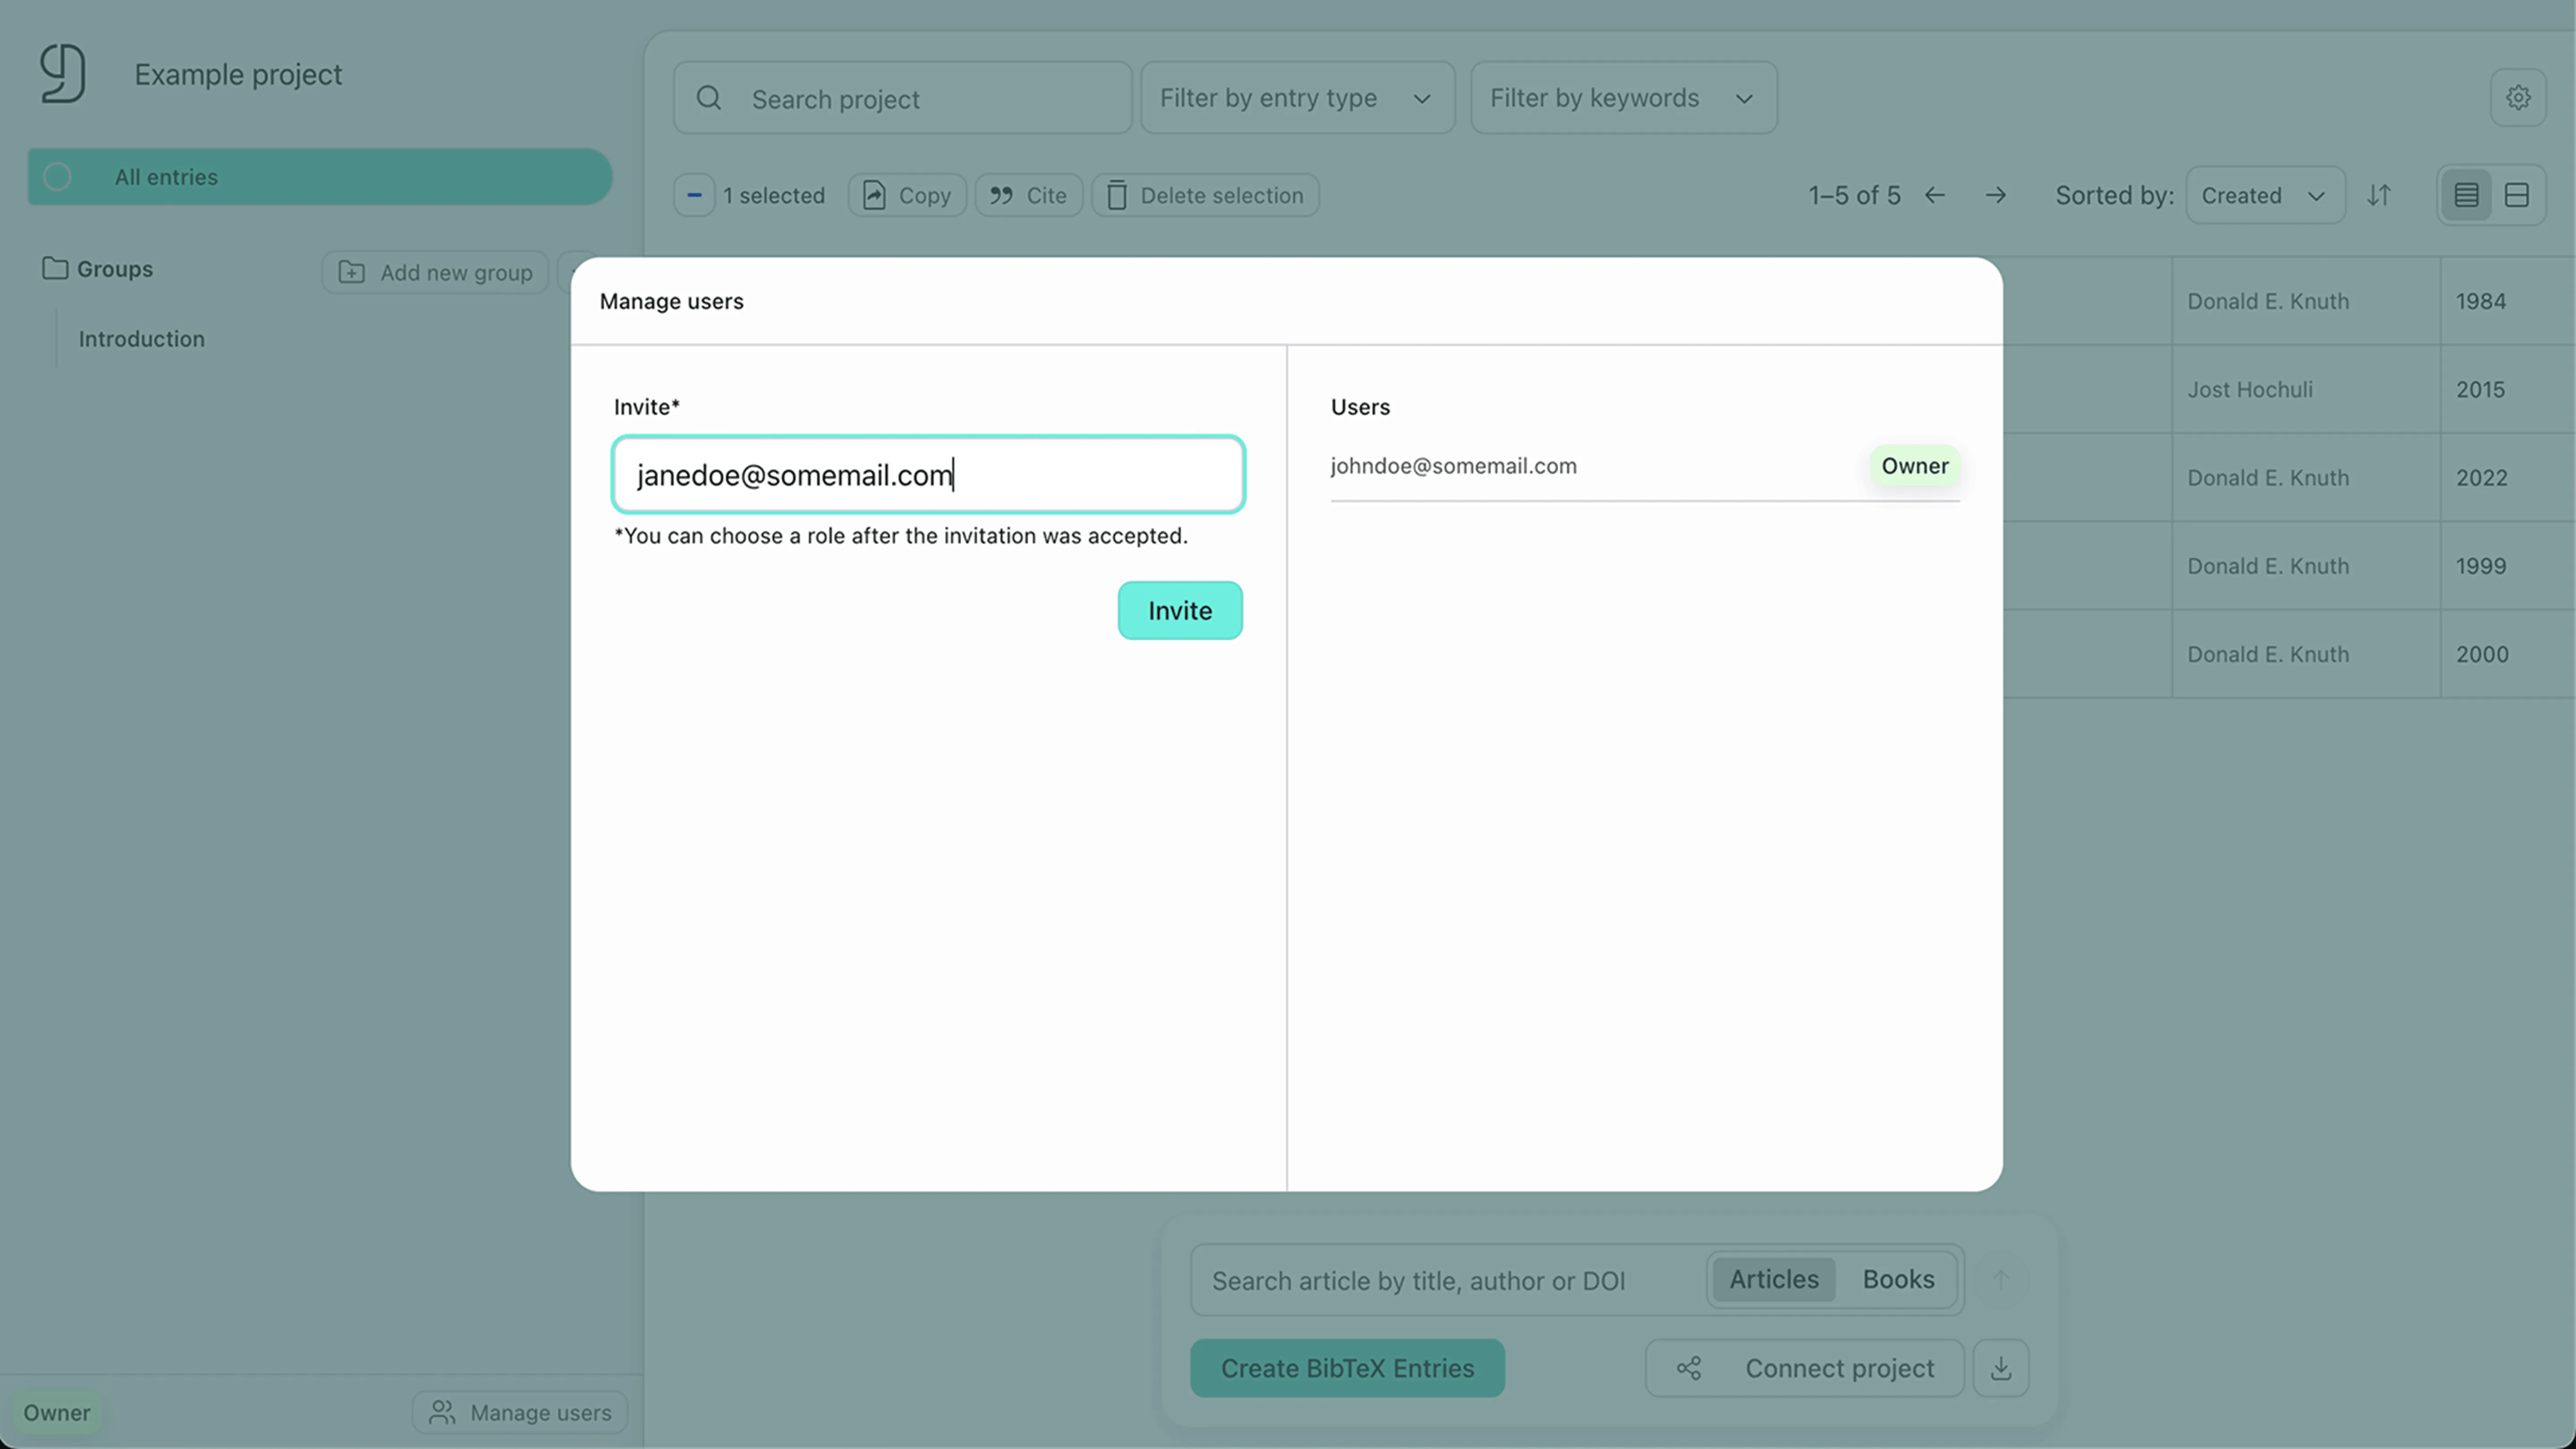
To add new members to your project, click Manage users in the left column. Enter the email address of the user you want to add. After the user accepts the invitation, you can assign them a role. The invitation is sent to the user by email.
Note
You can only invite users that have a valid CiteDrive account.